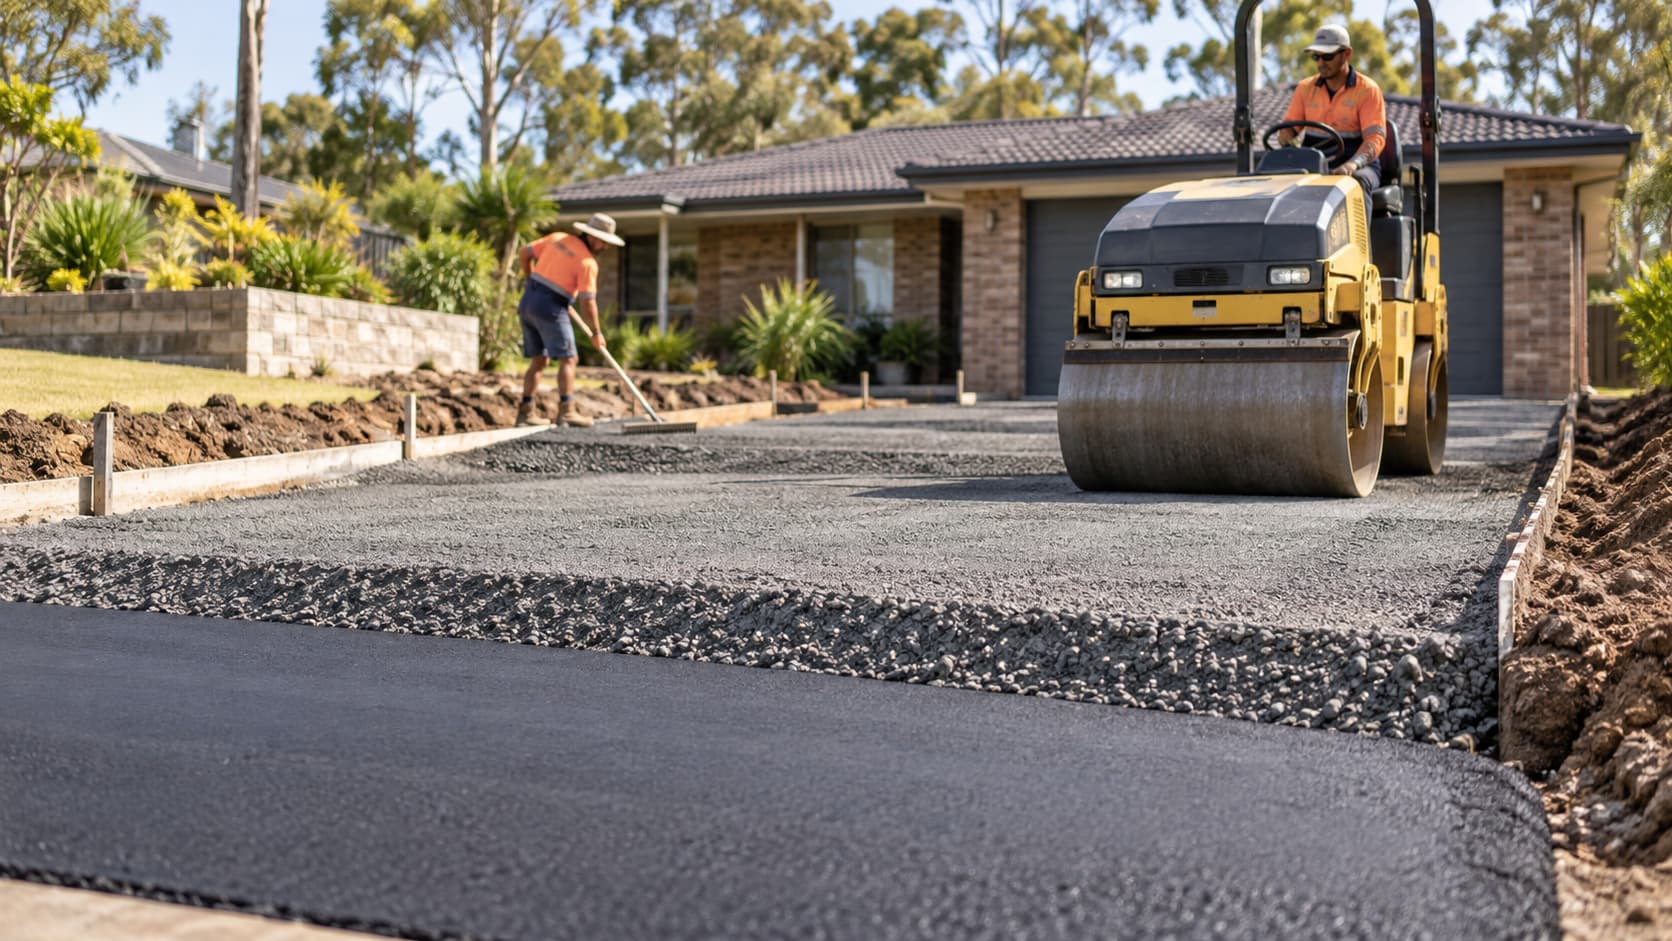
A durable asphalt driveway starts below the black surface. The ground must be assessed, unsuitable material removed where necessary, levels set for water runoff, and a suitable base placed and compacted before asphalt is laid.
Skipping preparation may reduce the initial quote, but it can leave the finished driveway vulnerable to movement, rutting, cracking and water damage. The correct preparation is site-specific, which is why a contractor should inspect the soil, slope, access and expected vehicle loads before confirming the scope.
Why the base matters as much as the asphalt
Asphalt is flexible compared with concrete, but it still relies on stable support. It spreads wheel loads across the pavement beneath it. If that supporting material moves, the asphalt can bend, crack or sink with it.
Think of the finished driveway as a system:
- the natural ground or subgrade supports everything above
- the pavement base distributes vehicle loads
- the asphalt provides the smooth, sealed wearing surface
- surface levels help move water away
- supported edges help prevent the pavement breaking apart
A thicker-looking surface cannot reliably compensate for a wet, soft or poorly compacted base.
Step 1: assess how the driveway will be used
Preparation begins with the vehicles and movements the driveway needs to handle.
A residential driveway used by two passenger vehicles has a different load from an acreage entrance used by delivery trucks, trailers or machinery. Turning wheels, braking areas and repeated parking positions can also place more stress on the pavement than straight, slow-moving traffic.
The site assessment should consider:
- normal vehicle types and weights
- occasional heavy deliveries
- driveway length and width
- steep sections and tight turns
- garage or shed thresholds
- crossover and road connection
- soft shoulders or unsupported edges
- existing services beneath the route
- access for excavation and paving equipment
It is better to discuss an occasional heavy truck before construction than after the first signs of movement appear.
Step 2: inspect the existing ground
The subgrade is the natural or prepared soil below the pavement base. Its condition can vary significantly across one property.
Potential issues include:
- soft or wet ground
- uncontrolled fill from earlier building work
- expansive or reactive soil
- organic material and tree roots
- old trenches crossing the driveway
- loose gravel placed without controlled compaction
- buried debris
- sections weakened by ongoing water flow
A visual inspection provides clues, but some sites may require further testing or engineering advice. This is more likely where access is steep, the ground is visibly unstable, heavy vehicles are expected or retaining structures affect the route.
The goal is not to excavate more than necessary. It is to remove or treat material that cannot provide reliable support.
Step 3: plan where water will go
Water is one of the biggest threats to pavement performance. It can enter through cracks, soften supporting material and wash out unprotected edges.
Driveway levels should encourage water to move to an appropriate outlet without sending runoff into buildings, neighbouring properties or unsafe areas. The plan should account for:
- fall away from garages and structures
- low points along the route
- runoff from roofs, slopes and adjoining land
- existing pits, channels or table drains
- council crossover requirements
- erosion at unsealed shoulders
- heavy Queensland rain
Asphalt paving does not replace hydraulic drainage design. If a site needs new pits, pipes, retaining structures or major water-management changes, the relevant specialist or approval authority may need to be involved before paving.
Correcting the water path first is usually more sensible than repeatedly repairing a wet section later.
Step 4: excavate to the required level
Excavation creates room for the base and asphalt while establishing the planned finished levels.
The excavation depth is not one standard number for every driveway. It depends on the ground, expected loads, selected pavement materials and any design requirements. Existing gravel may be reusable if it is suitable, clean and properly compacted, but it should not be assumed that every old driveway is ready for asphalt.
During excavation, the contractor should also confirm:
- where services enter the property
- whether soft spots appear below the surface
- how removed material will leave the site
- access for trucks and machinery
- finished height at gates, sheds and garage slabs
- whether adjoining edges need protection
Unexpected ground conditions are easier to manage when the quote explains how variations will be handled.
Step 5: place a suitable pavement base
The base is typically a graded pavement material placed between the ground and asphalt. Its job is to provide stable, even support and distribute vehicle loads.
A good base needs more than the right material name. It also needs:
- appropriate thickness for the site and traffic
- placement in manageable layers where required
- moisture conditions that allow effective compaction
- correct levels and crossfall
- a smooth, tightly compacted finish
- firm support at edges
Loose fill can settle after the asphalt is placed. Large stones, contamination or uneven areas can also make it difficult to produce a consistent finished surface.
Ask the contractor to identify the base material and preparation included in the quote rather than accepting a single line that says “supply and lay asphalt”.
Step 6: compact the base properly
Compaction increases the density and stability of the pavement material. It reduces the voids that allow particles to move under traffic.
The equipment and number of passes depend on the material, layer depth, moisture and site access. Tight residential areas may limit machinery choices, which should be considered during planning rather than discovered on paving day.
Signs that preparation deserves a closer look include:
- wheel tracks appearing in the base before paving
- soft areas that move under equipment
- loose aggregate at the surface
- water pumping up through the base
- uneven levels around thresholds
- edges crumbling before asphalt is placed
Where a specification requires density testing, confirm who arranges it and how results will be recorded. Not every residential driveway needs formal testing, but commercial or engineered scopes may.
Step 7: check levels, joins and edges
Before asphalt arrives, the base should reflect the intended shape of the finished driveway.
Important details include:
Garage and shed thresholds
The finished surface should meet adjoining slabs at a practical level without creating a trip point, sharp bump or path for water into the building.
Road crossover
Work near the road reserve may be controlled by the relevant council. Confirm whether the existing crossover can be retained and what approvals apply before changing it.
Existing concrete or paving
Joins need to be planned so the asphalt finishes neatly and remains supported. A thin feathered edge is more vulnerable to breaking away.
Unsealed shoulders
Driveway edges may need compacted support, especially where vehicles can leave the asphalt. Unsupported edges can crack when tyres repeatedly track over them.
Gates and drainage grates
Allow for the final asphalt level so gates continue to open and grates remain effective rather than becoming low or buried.
Step 8: coordinate access and paving day
Asphalt is delivered hot and needs to be placed and compacted within a workable timeframe. Access for trucks and paving equipment affects both efficiency and finish quality.
Before work begins, clarify:
- where equipment will enter and turn
- whether parked vehicles, trailers or bins need moving
- overhead clearance from trees or services
- whether neighbours share the access
- delivery timing and temporary road restrictions
- when pedestrians and vehicles can return
- weather conditions that may delay the work
Do not rely on a generic reopening time from an internet guide. The contractor should provide instructions for the actual asphalt mix, weather, surface temperature and vehicle type.
Asphalt and spray seal do not have identical preparation needs
Both asphalt and spray seal rely on a stable, correctly shaped base, but they are different surfacing systems.
Asphalt is a manufactured mixture of aggregate and bitumen binder placed and compacted as a continuous layer. Spray seal applies bitumen binder and aggregate to a prepared pavement surface. The right option depends on traffic, finish expectations, area, budget and site conditions.
Preparation should be designed for the selected treatment from the beginning. Choosing the surface after the base is complete can create avoidable changes to levels, material or scope.
For a direct material comparison, see RTB Civil’s guide to bitumen versus asphalt.
Can an existing gravel driveway be asphalted?
Often it can, but the existing gravel needs to be assessed rather than automatically paved over.
A contractor should check:
- material type and cleanliness
- depth and consistency
- compaction
- soft spots and rutting
- levels and water runoff
- edge support
- whether the driveway has widened informally over time
Some gravel may be suitable to reshape and compact. Other sections may need removal, replacement or additional pavement material. Covering visible ruts without addressing the support below can allow the same depressions to return.
What property owners can do before the quote
You do not need to design the pavement yourself. A few practical preparations will make the site discussion more useful:
- list the vehicles that normally use the driveway
- mention delivery trucks, caravans, trailers or machinery
- photograph where water sits after rain
- locate any known underground services
- check council information for crossover work
- identify gate, garage and shed levels
- decide whether access must remain available during construction
- point out buried fill, old trenches or previous repairs you know about
This information helps the contractor price the real use of the driveway rather than a best-case assumption.
Warning signs in a very low quote
Price matters, but preparation items should not disappear from the comparison.
Ask for clarification if a quote does not explain:
- excavation or treatment of unsuitable material
- base material and included quantity
- compaction
- asphalt area and specification
- treatment at edges and joins
- surface levels and runoff
- removal of spoil
- access limitations
- exclusions and possible variations
Two quotes can include different amounts of groundwork even when both describe the finished product as an asphalt driveway.
Frequently asked questions
How deep should an asphalt driveway base be?
There is no single depth suitable for every property. Ground strength, vehicle loads, drainage and the selected pavement material all affect the design. The contractor should confirm the site-specific scope after inspection.
Can asphalt be laid directly over dirt?
A durable driveway generally needs a prepared and compacted pavement base. Laying asphalt over soft or uneven ground can lead to movement and early failure.
Do you need to remove an existing gravel driveway?
Not always. Suitable existing material may be reshaped or incorporated, but contaminated, soft or poorly compacted areas may need to be removed or rebuilt.
Who handles driveway drainage?
The paving contractor should consider surface levels and identify obvious water risks within the asphalt scope. Separate pits, pipes, hydraulic design or major drainage works may require another specialist and relevant approvals.
Does an asphalt driveway need council approval?
Requirements vary, particularly for crossovers and work within the road reserve. Check with the relevant council before altering the connection between the property and the public road.
How long before vehicles can use new asphalt?
The answer depends on the asphalt, weather, site conditions and vehicle weight. Follow the project-specific instructions provided by the installer rather than assuming one timeframe applies to every driveway.
Build the driveway from the ground up
RTB Civil installs asphalt and bitumen driveways across Brisbane and South East Queensland. Our locally owned and operated team brings more than a decade of experience, with preparation and paving planned around the property, vehicle loads and Queensland conditions.
Learn more about our asphalt driveway service or request a free, no-obligation quote. Call 0423 783 556 to arrange a site inspection and discuss the right preparation for your driveway.